Why Does My Java Program Continuously Run After I Start It in Cmd
Introduction
The Raspberry Pi is a great single board computer, but like most computers, its functions rely mostly on human input. That means whenever you start up (or boot) your computer, it waits for your input to run programs. That's great, but how do we get our programs to run automatically whenever the computer boots?
Linux is a fairly complex operating system, and as such, there are often multiple ways to perform any one action. To get a program to run on boot, we will cover several ways. To show some example programs, we will blink an LED and turn the Raspberry Pi into a clock.

While using the Raspberry Pi as a clock might seem like overkill, feel free to substitute your own program or script instead. You are also welcome to use the example code as the basis for your own dashboard (e.g. show the local forecast when you wake up, your personal server uptime, number of days left until your favorite show, etc.) or electronics project.
Notice: This tutorial was written with Raspbian version "June 2018" and Python version 3.5.3. Other versions may affect how some of the steps in this guide are performed.
Before adding your program to any startup script, it's extremely important that you test it first on its own! Run it with just the python command to make sure there are no problems with your program. It's much harder to track down bugs in your code when it runs as part of the boot process.
The three methods covered in this tutorial are:
- rc.local - Likely the easiest and simplest way to get your program to run on boot. The downside is that tasks started with rc.local happen before the X windows system starts, which means you will not have access to graphical user interface (GUI) elements.
- autostart - Used to automatically run your programs once LXDE (graphical desktop environment used by Raspbian) starts. It's slightly more complicated than rc.local, but it lets you run programs that require graphical elements.
- systemd - The new and popular way to automatically start programs in Linux. It is definitely the most complicated of the three, but it allows you to run before LXDE starts, wait until you have access to other processes (e.g. networking, graphical desktop), or simply restart your program over and over again until it works. As such, it is a robust way to create and manage services that run in the background.
Required Materials
At a bare minimum, you will need a Raspberry Pi, SD card, and power supply for this tutorial. If you plan to make a dashboard (or clock, as given by the example code in the next section), you will need a monitor and keyboard for your Pi. If you would like a full desktop setup, we recommend the following:
Suggested Reading
If you aren't familiar with the following concepts, we recommend checking out these tutorials before continuing:
Python GUI Guide: Introduction to Tkinter
Tkinter is the standard graphical user interface package that comes with Python. This tutorial will show you how to create basic windowed applications as well as complete full-screen dashboard examples complete with live graph updates from matplotlib.
Please note: If you have trouble seeing any of the images throughout this tutorial, feel free to click on it to get a better look!
![]()
Example Code
In the rest of the tutorial, we will show starting Python programs on boot with two examples: blink.py and clock.py. Note that any program (compiled, script, etc.) can be used, but choosing the right method for starting your script is important. For example, using rc.local, while easy, does not give you access to the X server (the thing that gives you a GUI desktop). So, rc.local for a GUI program is not the right tool, and you should try another method.
The Linux boot sequence is a fairly complex sequence of events, which can easily be its own article for another time. If you would like to learn more about it, check out these links:
- 6 Stages of Linux Boot Process
- An Introduction to the Linux Boot and Startup Processes
- Understanding the Linux Boot Process (YouTube Video)
blink.py
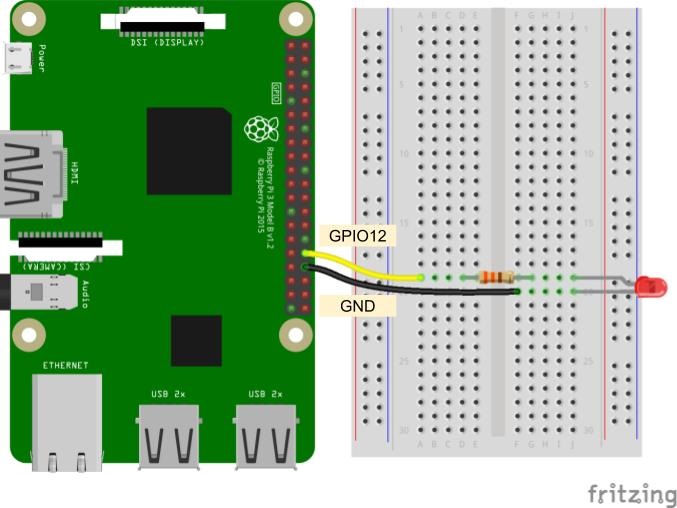
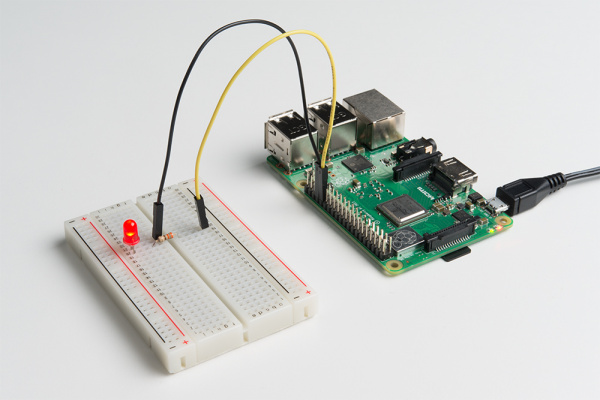
While external connections to hardware is not necessary to show how to run a program on boot, it can be a useful way to show that something is running in the background, even if you do not see anything on the screen. Connect an LED and a 330 Ω resistor between GPIO12 and GND on the Raspberry Pi.
On your Raspberry Pi, open a terminal, and make sure you are in your home directory:
language:shell cd /home/pi Open a new document named blink.py
language:shell nano blink.py Copy in the following code:
language:python import time import RPi.GPIO as GPIO # Pin definitions led_pin = 12 # Use "GPIO" pin numbering GPIO.setmode(GPIO.BCM) # Set LED pin as output GPIO.setup(led_pin, GPIO.OUT) # Blink forever try: while True: GPIO.output(led_pin, GPIO.HIGH) # Turn LED on time.sleep(1) # Delay for 1 second GPIO.output(led_pin, GPIO.LOW) # Turn LED off time.sleep(1) # Delay for 1 second # When you press ctrl+c, nicely release GPIO resources finally: GPIO.cleanup() Save it with ctrl + x, press y when asked to save, and press enter. Run the program with the following:
language:shell python blink.py You should see the LED begin to blink on and off. Press ctrl + c to stop the program.
clock.py
The next example that we'll use is slightly more complicated, as it relies on a GUI made with the Tkinter package. We'll use this program when we want to demonstrate how to start a program on boot that requires the X windows system (for example, you want to make a graphical dashboard that is displayed on boot).
On your Raspberry Pi (in your home directory, /home/pi), open a new document with the name clock.py:
language:shell nano clock.py Copy in the following code:
language:python import tkinter as tk import tkinter.font as tkFont import time ############################################################################### # Parameters and global variables # Default font size font_size = -24 # Declare global variables root = None dfont = None frame = None dtime = None # Global variable to remember if we are fullscreen or windowed fullscreen = False ############################################################################### # Functions # Toggle fullscreen def toggle_fullscreen(event=None): global root global fullscreen # Toggle between fullscreen and windowed modes fullscreen = not fullscreen root.attributes('-fullscreen', fullscreen) resize() # Return to windowed mode def end_fullscreen(event=None): global root global fullscreen # Turn off fullscreen mode fullscreen = False root.attributes('-fullscreen', False) resize() # Automatically resize font size based on window size def resize(event=None): global time_dfont global button_dfont global frame # Resize font based on frame height (minimum size of 12) # Use negative number for "pixels" instead of "points" new_size = -max(12, int((frame.winfo_height() / 2))) time_dfont.configure(size=new_size) new_size = -max(12, int((frame.winfo_height() / 30))) button_dfont.configure(size=new_size) # Read values from the sensors at regular intervals def update(): global root global dtime # Get local time local_time = time.localtime() # Convert time to 12 hour clock hours = local_time.tm_hour if hours > 12: hours -= 12 # Add leading 0s shours = str(hours) smin = str(local_time.tm_min) if hours < 10: shours = '0' + shours if local_time.tm_min < 10: smin = '0' + smin # Construct string out of time dtime.set(shours + ':' + smin) # Schedule the poll() function for another 500 ms from now root.after(500, update) ############################################################################### # Main script # Create the main window root = tk.Tk() root.title("My Clock") # Create the main container frame = tk.Frame(root, bg='black') # Lay out the main container (expand to fit window) frame.pack(fill=tk.BOTH, expand=1) # Variables for holding temperature and light data dtime = tk.StringVar() # Create dynamic font for text time_dfont = tkFont.Font(family='Courier New', size=font_size) button_dfont = tkFont.Font(size=font_size) # Create widgets label_time = tk.Label( frame, textvariable=dtime, font=time_dfont, fg='red', bg='black') button_quit = tk.Button(frame, text="Quit", font=button_dfont, command=root.destroy, borderwidth=0, highlightthickness=0, fg='gray10', bg='black') # Lay out widgets in a grid in the frame label_time.grid(row=0, column=0, padx=20, pady=20) button_quit.grid(row=1, column=0, padx=5, pady=5, sticky=tk.E) # Make it so that the grid cells expand out to fill window frame.rowconfigure(0, weight=10) frame.rowconfigure(1, weight=1) frame.columnconfigure(0, weight=1) # Bind F11 to toggle fullscreen and ESC to end fullscreen root.bind('<F11>', toggle_fullscreen) root.bind('<Escape>', end_fullscreen) # Have the resize() function be called every time the window is resized root.bind('<Configure>', resize) # Schedule the poll() function to be called periodically root.after(20, update) # Start in fullscreen mode and run toggle_fullscreen() root.mainloop() Save it with ctrl + x, press y when asked to save, and press enter. Run the program with the following:
language:shell python clock.py Your entire screen should be taken up by a rather large clock!
If you are interested in learning more about how this program was made (i.e. creating your own graphical user interface with Tkinter), check out our Python GUI Guide: Introduction to Tkinter.
Method 1: rc.local
Running your program from rc.local is likely the easiest method, but because rc.local is executed before X starts, you will not have access to GUI elements. As a result, it's recommended that you only use rc.local for starting programs that do not have graphical elements.
As your Linux operating system (OS) boots on your Raspberry Pi, it goes through a series of runlevels, which define the state of the system during startup. Whenever the runlevel changes, various run control (rc) scripts are run, which handle starting and stopping various system services. If you would like to learn more about rc scripts, see this article, but for our purposes, we just need to worry about rc.local.
The rc.local script is executed after all of the normal system services have been started (including networking, if enabled) and just before the system switches to a multiuser runlevel (where you would traditionally get a login prompt). While most Linux distributions do not need an rc.local, it's usually the easiest way to get a program to run on boot with Raspbian.
Modify rc.local
You will need root-level access to modify rc.local, so do so with sudo:
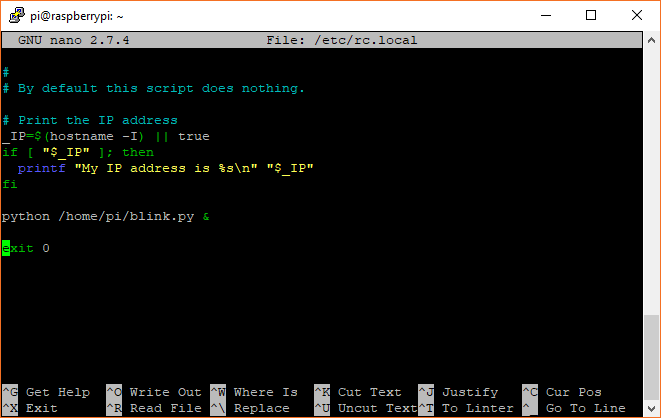
language:shell sudo nano /etc/rc.local Scroll down, and just before the exit 0 line, enter the following:
language:shell python /home/pi/blink.py & Note: the ampersand (&) at the end of the line is needed so that your Python script runs in a different process and does not block execution of the boot process. Without it, the rc.local script would wait for your script to end before continuing, and if you have an infinite loop (like in our blink.py program), you would never get a login prompt.
Notice that we are calling our script with the absolute file location (/home/pi/blink.py), as calling python blink.py from within rc.local will cause python to look for a local file (i.e. blink.py file located in the same directory as rc.local). We use the absolute file location to make it explicit to Python where our program can be found.
Save and exit with ctrl + x, followed by y when prompted to save, and then enter.
Test it by restarting your Pi with sudo reboot.
Troubleshooting
Nothing Happens
If your script is not running, ensure that your script is called with the absolute directory name (e.g. python /home/pi/blink.py &).
If you cannot access the desktop because your script is preventing Linux from finishing its boot sequence, then you might have to get a terminal over serial. Follow these instructions to get a serial terminal into the Pi.
If you cannot get a serial terminal into your Raspberry Pi, then you will likely need to plug your SD card into another computer (Linux or macOS), navigate to etc/rc.local, and remove the line that calls your Python script.
Debugging
You might notice that you don't see any errors or output from your script, as rc.local does not log or output any information. To get that, change the python call in your rc.local file to the following:
sudo bash -c 'python /home/pi/blink.py > /home/pi/blink.log 2>&1' & This creates a new shell with sudo (superuser privileges), runs your script, and redirects the output (stdout) to the blink.log file. 2>&1 Says that errors (stderr) should also be redirected to the same log file. Upon rebooting, any output from your Python script (e.g. print() statements) as well as errors should be saved to blink.log. To view the log, enter the following into a terminal (note that you might need to stop your program first to view the contents of the log file):
language:shell cat blink.log Use a Specific Version of Python
As it turns out, rc.local runs before .bashrc, so the command python still refers to Python 2 in our startup script! To explicitly call Python 3, we should change our rc.local command to:
language:shell sudo bash -c '/usr/bin/python3 /home/pi/blink.py > /home/pi/blink.log 2>&1' & How to Stop Your Program
You might notice that your program runs great, but there's no easy way to stop it! The simplest method would be to remove (or comment out) the line you added in rc.local followed by a reboot, but that takes a lot of time.
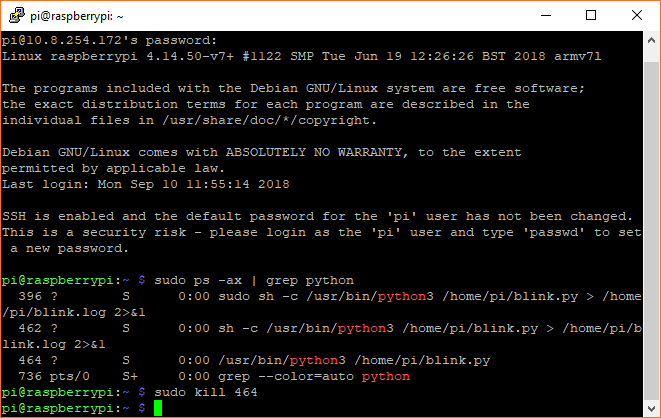
The quickest way to stop your program is to kill its Linux process. In a terminal, enter the following command:
language:shell sudo ps -ax | grep python ps -ax tells Linux to list out all the currently processes. We pipe that list to grep, which allows us to search for keywords. We're looking for python in this example, but feel free to change it to the name of your program or whatever you are using to run your program. Find the process ID (PID) number to the left of the listed process, and use the kill command to terminate that process:
language:shell sudo kill <PID> Heads up! Make sure you type the PID correctly! If you kill the wrong process, you could halt Linux, and you would need to reboot again.
If you are using the blink.py example, you should see the LED cease flashing.
How to Stop Your Program from Running on Boot
If you no longer want your program to run on boot, simply open rc.local with:
language:shell sudo nano /etc/rc.local Delete the line that you added to run your program, and save and exit with ctrl + x and y. Reboot your computer, and your program should no longer run after boot.
Another Option
rc.local is a good place to start your program whenever the system boots up (before users can log in or interact with the system). If you would like your program to start whenever a user logs in or opens a new terminal, consider adding a similar line to /home/pi/.bashrc.
Method 2: autostart
If you need access to elements from the X Window System (e.g. you are making a graphical dashboard or game), then you will need to wait for the X server to finish initializing before running your code. One way to accomplish this is to use the autostart system.
Note: Raspbian is based on the LXDE desktop environment. As a result, the location of the autostart script might be different depending on your particular Linux computer and distribution version.
After your desktop environment starts (LXDE-pi, in this case), it runs whatever commands it finds in the profile's autostart script, which is located at /home/pi/.config/lxsession/LXDE-pi/autostart for our Raspberry Pi. Note that the directory pi might be different if you created a new user for your Raspberry Pi. If no user autostart script is found, Linux will run the global /etc/xdg/lxsession/LXDE-pi/autostart script instead.
In addition to running commands in autostart, Linux will also look for and execute .desktop scripts found in /home/pi/.config/autostart. The easiest way to execute GUI programs on boot is to create one of these .desktop scripts.
Create a .desktop File
You do not need root-level access to modify your profile's (user's) autostart and .desktop files. In fact, it is recommended that you do not use sudo, as you may affect the permissions of the file (e.g. the file would be owned by root) and make them unable to be executed by autostart (which has user-level permissions).
Open a terminal, and execute the following commands to create an autostart directory (if one does not already exist) and edit a .desktop file for our clock example:
language:shell mkdir /home/pi/.config/autostart nano /home/pi/.config/autostart/clock.desktop Copy in the following text into the clock.desktop file. Feel free to change the Name and Exec variables to your particular application.
[Desktop Entry] Type=Application Name=Clock Exec=/usr/bin/python3 /home/pi/clock.py Note: We are calling python3 explicitly here to prevent any confusion about which Python version to use.
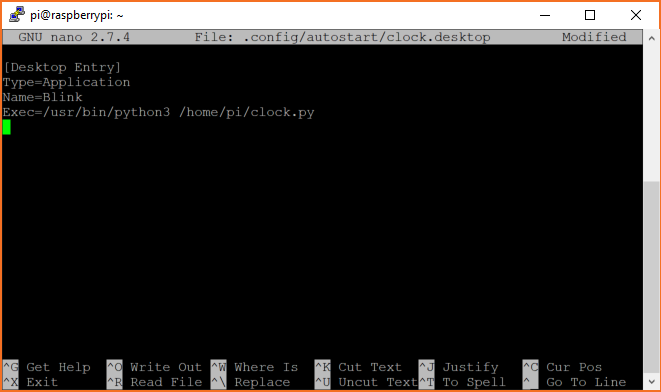
Save and exit with ctrl + x, followed by y when prompted to save, and then enter. Reboot with:
language:shell sudo reboot When your Raspberry Pi starts up, make sure to log in to the desktop (if it does not do so automatically). Your script should start running right away!
Troubleshooting
Nothing Happens
If your script does not run as soon as you see the desktop, there could be several issues. First, make sure that you have logged in (autostart does not start until you have logged in). You could also try enabling auto-login in raspi-config. Second, make sure you are using absolute directory names (e.g. /home/pi/clock.py). Third, try following some of the suggestions below to enable stdout and stderr to see what's going on.
Use a Specific Version of Python
As it turns out, autostart runs before .bashrc, so the command python still refers to Python 2. To explicitly call Python 3, we should change our command in autostart to:
@/usr/bin/python3 /home/pi/clock.py Debugging
Unfortunately, running a program from autostart makes it difficult to output or log to a file, and lxterminal (the default terminal program in Raspbian) is too simplistic to help us here. To get some kind of logging, we'll need to use a different terminal program (we'll use xterm). Open a terminal and enter the following command
language:shell sudo apt-get install xterm -y In your .desktop file, change your Exec command to the following:
Exec=xterm -hold -e '/usr/bin/python3 /home/pi/clock.py' Restart your Raspberry Pi. Now, after you log into your desktop, you should see a new terminal window open followed by your program running. If you stop your program (exiting out of it, pressing ctrl + c in the xterm window, or killing the process as detailed below), the xterm window will stay open, allowing you to read all of the output and error statments from your program.
How to Stop Your Program
If your program is running in the background, there might be no obvious way of halting it. You can always delete your .desktop files and restart, but that might take a while. A better option might be to kill the process associated with your program. In a terminal, enter the following:
language:shell sudo ps -ax | grep python ps -ax tells Linux to list out all the currently processes. We send that output to grep, which allows us to search for keywords. Here, we're looking for python, but feel free to change it to the name of your program. Find the process ID (PID) number to the left of the listed process, and use the kill command to terminate that process:
language:shell sudo kill <PID> Heads up! Make sure you type the PID correctly! If you kill the wrong process, you could halt Linux, and you would need to reboot again.
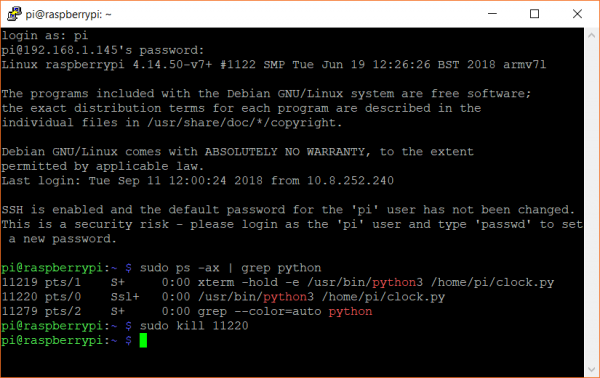
If you are using the clock.py example, you should see the application quit out.
How to Stop Your Program from Running on Boot
To prevent your program from running on boot, you just need to delete the .desktop file. In a terminal, enter the command (replacing clock.desktop with the name of your particular .desktop file):
language:shell rm /home/pi/.config/autostart/clock.desktop Reboot your Pi, and your program should no longer run on startup.
Method 3: systemd
systemd is the preferred method of starting applications on startup, but it is also one of the most complicated to use. With systemd, you have the benefit of being able to tell Linux to start certain programs only after certain services have started. As a result, it is a very robust tool for initializing your scripts and applications.
systemd is a relatively new suite of tools in the Linux world, and one of its intended purposes is to manage system processes after booting. When it was first released, systemd was meant to replace the init.d tool for starting programs. As of 2015, most of the major distributions include systemd, and since many kept init.d around for legacy support, you have the option of using either one. Be aware, however, that init.d may be deprecated, so systemd seems to be the future (for now).
systemd can be quite complicated, and this tutorial only covers the absolute basics to get you started running your programs on boot. If you would like to dig deeper into the world of systemd, we recommend reading this getting started guide.
Create a Unit File
A unit file is a plain text file that gives information to systemd about a service, device, mount point, etc. We'll create a unit file that starts our program as a service (a process that runs in the background). Below are two examples of unit files: the first runs the blink.py example before the graphical desktop loads (useful for headless environments), and the second runs the clock.py example after the graphical desktop loads (useful if you are making a dashboard or GUI).
Unit File (No GUI)
If your program does not require a GUI (such as our blink.py example), then you can use the following template to create a systemd service. If you do need a GUI (e.g. you require the X Windows System to have started), see the next section. Creating a unit file without requiring a GUI means you can also run your program on boot in a headless environment.
Create a new .service file in the systemd directory:
language:shell sudo nano /lib/systemd/system/blink.service Enter the following text into the document:
[Unit] Description=Blink my LED After=multi-user.target [Service] ExecStart=/usr/bin/python3 /home/pi/blink.py [Install] WantedBy=multi-user.target Feel free to change the Description as desired. The After key denotes when our program should run. multi-user.target is the system state where control is given over to the user (a "multi-user shell") but before the X Windows System is started. That means our program will run even without logging in! You can change this, depending on which services you need active before running your program (for example, network.target if you need networking). See here for a listing of all targets.
ExecStart is the command (or set of commands) used to start our program. Notice that we are using absolute paths to the version of Python we want as well as the location of our program.
WantedBy in the [Install] section specifies the target we want our service to be included with. In this example, we want our service to run when the multi-user.target unit is run (or, more specifically, just after it, based on the After parameter).

Save and exit with ctrl + x, followed by y when prompted to save, and then enter.
We need to tell systemd to recognize our service, so enter:
language:shell sudo systemctl daemon-reload Note that you will need to enter this command every time you change your .service file, as systemd needs to know it has been updated.
We then need to tell systemd that we want our service to start on boot, so enter:
language:shell sudo systemctl enable blink.service Reboot with sudo reboot to verify that your program works. The LED should begin blinking after the Pi boots!
Unit File (GUI)
If your program requires graphical components (as in our clock.py example), then the following template is recommended for creating a systemd service.
Create a new .service file in the systemd directory:
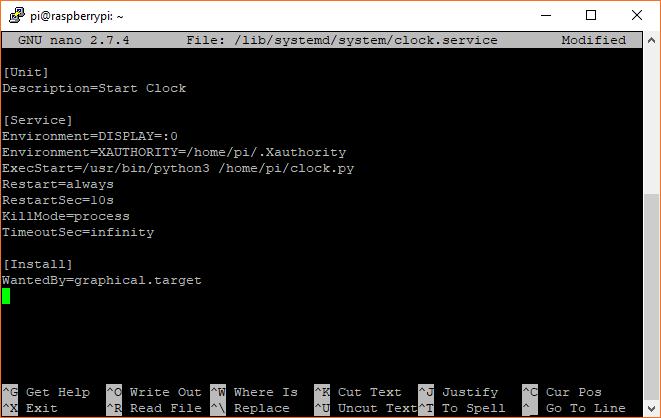
language:shell sudo nano /lib/systemd/system/clock.service Enter the following text into the document:
[Unit] Description=Start Clock [Service] Environment=DISPLAY=:0 Environment=XAUTHORITY=/home/pi/.Xauthority ExecStart=/usr/bin/python3 /home/pi/clock.py Restart=always RestartSec=10s KillMode=process TimeoutSec=infinity [Install] WantedBy=graphical.target Description can be any text you want to help you remember what this service does.
Under [Service], we specify some environment variables. We want to connect to our primary display (this assumes only one display is connected to our Pi), so we set DISPLAY to :0, and we tell our application where to find the necessary credentials to use the X windows system with XAUTHORITY. ExecStart is the command we want to run (starting our Python clock program, in this case).
Unfortunately with systemd, we cannot tell exactly when the X system will start, and we cannot necessarily guarantee that a user will be logged in (unless you have enabled auto-login with sudo raspi-config). To account for this, we will brute force our program to restart (with Restart) every 10 seconds (with RestartSec) if it fails or exits. KillMode tells systemd to kill off any processes associated with our program if the service fails (or exits), and TimeoutSec=infinity means that we don't ever want to stop trying to execute our program.
Save and exit with ctrl + x, followed by y when prompted to save, and then enter.
We need to tell systemd to recognize our service, so enter:
language:shell sudo systemctl daemon-reload Note that you will need to enter this command every time you change your .service file, as systemd needs to know it has been updated.
We then need to tell systemd that we want our service to start on boot, so enter:
language:shell sudo systemctl enable clock.service Reboot with sudo reboot to verify that your program works. You should see your Python clock program running after you have logged into your graphical desktop.
Troubleshooting
Nothing Happens
If your program does not seem to run on boot, several things could be going on. To get insight into the systemd service, try logging output to a file or checking on the status of the service (see the troubleshooting techniques below).
Debugging
Output from systemd (e.g. print() statements or error messages) is captured by the journalctl system and can be viewed with the following command:
language:shell journalctl -u clock.log This can off some insight into what's going on with your service or program.
Logging to a File
If journalctl is not living up to your expectations, you can try logging output to a file. To do that, change the ExecStart call to the following (using clock.py as an example):
ExecStart=/bin/bash -c '/usr/bin/python3 /home/pi/clock.py > /home/pi/clock.log 2>&1' This starts a new bash shell, runs your program, and redirects the output (stdout) to a new clock.log text file. The 2>&1 command says that any errors (stderr) should also be redirected (written to) the same log file. Any output (e.g. from Python print() commands) or errors will then be saved to clock.log. You can view the log with the following command (note that you might need to stop the service and program before viewing the log):
language:shell cat clock.log Use a Specific Version of Python
Because your systemd unit file will likely run before .bashrc can alias the command python to Python 3, you might need to explicitly call the python3 command. To do that, just make sure that your call to Python is an absolute file location, for example, /usr/bin/python3.
Checking the Service
If you suspect that your service is not running, then you might want to check the status of it. To do that, enter the following command:
language:shell systemctl status clock.service This should show you if your service is running or if there were any errors.

Starting and Stopping the Service
For some services, like our clock.service example, you will need to stop the service before stopping the program. That's because even if you stop the program (e.g. our Python GUI clock), the service will simply restart it 10 seconds later! To stop a service, enter the following command:
language:shell sudo systemctl stop clock.service Note that stopping the service should send a stop command (SIGTERM--terminate signal) to your program. In most cases, this should stop the service and your program. If your program does not stop, see below on stopping your program.
To start a service (such as our clock.service example), you can enter the command:
language:shell sudo systemctl start clock.service This can be helpful to restart a service if you've made changes to it without having to reboot the system. Just remember to run sudo systemctl daemon-reload if you do make any changes to a .service file!
How to Stop Your Program
Even if you stop the service, your program may still be running in the background. Just like in the rc.local and autostart examples, we will need to hunt down the process ID number and kill it manually. Enter the following in a terminal:
language:shell sudo ps -ax | grep python ps -ax tells Linux to list out all the currently processes. We send that output to grep, which allows us to search for the keyword "python" (feel free to change it to the name of your program). Find the process ID (PID) number to the left of the listed process, and use the kill command to terminate that process:
language:shell sudo kill <PID> Heads up! Make sure you type the PID correctly! If you kill the wrong process, you could halt Linux, and you would need to reboot again.
If you are using the clock.py example, you should see the application quit out.
How to Stop Your Program from Running on Boot
You can stop your service from running on boot with the following command (replacing clock.service with your particular service filename):
language:shell sudo systemctl disable clock.service Note that you do not need to delete the .service file, as disabling it will prevent it from running on startup. However, if you would like to delete the file, you can using the following commands (once again, replacing clock.service with your service filename):
language:shell sudo rm /lib/systemd/system/clock.service sudo systemctl daemon-reload After that, reboot your system to make sure that your program no longer runs on boot.
Resources and Going Further
As with most things Linux, there is often more than one way to accomplish a task. This tutorial showed you three different methods for starting programs (or scripts) on boot. All three should come default with Raspbian, which means each of the methods should work with a full Raspbian installation. If you use another operating system (or Raspbian Lite), you might find that only some of the methods are available, so pick what works for you!
If you would like to dig deeper into each of the methods, please see the following documentation:
- rc.local is part of a larger rc tool suite that you can use to schedule tasks on boot
- autostart comes with the LXDE desktop environment in Raspbian. Other environments might have a different application starter tool.
- systemd is a suite of tools used to start various tasks in Linux
There are also plenty of other Linux tools out there to help you start a task on boot. If none of the above three work for you, we recommend checking out:
- SysVinit is a legacy method for running programs on boot
- crontab is used to schedule tasks that run regularly (e.g. once per day at a particular time)
![]()
Looking for more inspiration? Check out these other Raspberry Pi projects:
Source: https://learn.sparkfun.com/tutorials/how-to-run-a-raspberry-pi-program-on-startup/all
0 Response to "Why Does My Java Program Continuously Run After I Start It in Cmd"
Post a Comment